Plumbing
Orientation notes
notes here
Course time split:
Material: https://atelier-des-chefs.riseup.fr/Training/view/15618/step/85472?language=1
Plumbing dictionary: https://atelier-des-chefs.riseup.fr/Catalog/resources/1633
Plumbers are experts at the routing and evacuation of water.
DTU: Document Technique Unifié
EPI: équipements de protection individuelle. Equipment needed: https://atelier-des-chefs.riseup.fr/Training/view/15618/step/85477?language=1
EPC: Équipements de Protection Collective
Things to take to exam: https://atelier-des-chefs.riseup.fr/Training/view/15618/step/85488?language=1
Plumbing supply store: Balitrand
Environment notes

Cast iron (La fonte): used for collective downpipes for rainwater (descentes collectives d’eaux pluviales), black water (l’eau des vannes) and wastewater (les eaux usées).
Fire resistant and more resistant than PVC, but very heavy. 150€ / tube 2m

Copper (le cuivre): It is used to supply water to homes. It is highly resistant over time. It comes in the form of hard drawn tubes (tube écroui en barre) in 1, 2, 4 or 5 metre lengths, or in coils (en couronne) of 10, 25 or 50 metres of annealed copper (cuivre recuit). Quite expensive. 10€ le m en 14 mm en barre et 500€ la couronne de 50 m en 14 mm

PVC: used to evacuate waste water between private and public areas (entre les parties privées et collectives). PVC has replaced lead, which is now banned in the building industry.
Very easy to install, it requires no welding and is very economical. Not very nice looking and fragile compared to other metals. 10€ la barre de 2 mètres en 100 mm

Le PER: used to supply water to the home. It can be used for both sanitary plumbing and heating installations. It is made of a semi-rigid material similar to copper piping. It has two colours, making it easy to recognise and install: red for hot water and blue for cold water. It is bent by hand and does not need to be welded. Fittings (raccords) costs a lot. 112€ la couronne de 125 m en 16 mm

Le tube multicouche: used for drinking water in sanitary networks and for heating water. It is made up of three layers (one aluminium and two PEX). Very resistant to corrosion and heat, but very recent product so don’t know inconvienients yet. 25€ le tube de 5 m en 16 mm

Le tube polyéthylène: Used for the general water supply to your home before the meter and for watering. It is generally buried outdoors. It comes in different colours depending on its use: blue for drinking water, yellow for gas and orange for sewerage. Inexpensive, strong and durable. The connection between two pipes is particularly delicate. 120€ la couronne de 50 m en 32 mm pour l’eau. 110€ couronne de 50 m en 32 mm pour le gaz

Un crayon de charpentier

Une patte à vis

Une rosace d’écartement

Un collier
Traçage

- To do a traçage, vertically, mark 2 points (vertical mark), then with a spirit level draw the line between them.

2. For horizontal, do the same (marks are horizontal), descending 1cm per metre on the second mark, using the level to draw the line.

3. Mark the place for the collier at regular intervals (horizontal marks).

4. Drill
5. Position the collier and tighten a maximum so they don’t move anymore.

6. To gain in efficiency, open the collier with a screwdriver to anticipate la pose.
Material and equipment notes
Les colliers de fixation (pipe clamps) are used to immobilise the pipe so that it cannot move.
They can be single or double.
Double clamps are used to maintain a constant distance between two pipes following the same route.
Les rosaces d’écartement (spacer rosettes) are metal parts inserted between the screw bracket (patte à vis) and the collar (collier). They can be conical, flat or of different sizes and diameters.
- Their main function is to move the pipes away from the wall to make it easier to fit nuts and fittings.
- They also have a mechanical effect, distributing loads.
- They can also play an aesthetic role by hiding any chips in the masonry.
Les pattes à vis (screw brackets) are metal parts consisting of a pointed end and a flat end.
- The pointed end is driven into the wall.
- The flat end is used to hold the collar.

PVC stands for “Polyvinyl Chloride” (polychlorure de vinyle)
In the case of two male spigots (deux embouts mâles), a sleeve fitting (raccord manchon) must be used.
Straight fittings (les raccords droits):

Elbow fittings (Les raccords coudés):

Reducers (Les réductions):

Drill bits: Forets (called mèche for wood, béton, or carrelage)
It is the communal drains (évacuations communes) that determine the location of the bathrooms in flats. It is forbidden to discharge wastewater (eaux usées) with rainwater (eaux pluviales).

Common drainage columns can be :
- En fonte (cast iron): Noble material, highly resistant to temperature change, High cost and heavy weight.
- En PVC: easy to install and light, expands a lot and is not the strongest material.
The hacksaw (scie à métaux) is a manual saw used by plumbers to make various cuts on site: metal, PVC, etc.
When cutting PVC, mark with a marker, hold the PVC on your quads and with your hand (gloves).

PVC


Emery cloth (la toile émeri) is paper coated on one side with abrasive material. It is used in plumbing to polish or clean the surface and interior of copper or PVC pipes so that they can be painted, glued or assembled. It comes in rolls.
An emery cloth is chosen according to its grain. > The higher the number associated with the grain, the finer the grain of the cloth. For example, 240 grit is 4 times finer than 60 grit. > For plumbing, use 80 to 120 grit emery cloth.


Evacuation sanitaire notes
Réductions incorporées: go inside the tube with the biggest diameter. They are therefore invisible.

For a réductions incorporées, the raccord needs to be female:


Clean the tubes:
…the manchon:

…and the reduction:

Note with a marker on the tube the zone to glue:

Glue:


A PVC branch saddle (Une selle de branchement PVC) is an additional connection to an existing water main (une conduite d’eau principale). It allows the plumber to make a drain connection to a main pipe, which in turn goes down to the sewer.
The PVC branch saddle is placed astride the main drain pipe of the installation.
They are often used for renovations, and can be used to connect sanitary fittings, for example, without having to dismantle the entire drain.
Reduction saddles are available in several diameters.

Perceuse avec scie-cloche:

Repiquage:


d’eaux usées
- Les eaux ménagères ou eaux grises (cuisine, salle de bain…)
- Les eaux vannes ou eaux noires pour les WC


Classic PVC glue: Gluing rigid PVC pipes and fittings.
PVC pression glue: Pressurised systems Drainage systems Quick-set Resistant to hot and cold water.
PVC piscine glue: Special for swimming pool pipes Fast setting Highly resistant to pressure.
The drain plug (Le bouchon de dégorgement or tampon de visite): in case of blockage, allows access to unblock. Often on Té or Y raccords for an easy access.


The drain plugs must be made of the same material as the installation pipework. Today’s new pipes are made of PVC, but you can also find some made of brass (laiton).

A heat gun (décapeur thermique) is an electric tool that blows hot air (up to 600°). The high temperature of the air it blows softens the fittings, making it easy to remove two tubes using a screwdriver and a pair of pliers (pince multiprise). The pipe stripper is very often used in plumbing for repairs when a broken or damaged fitting needs to be replaced.
Prevention of risks notes
Raccorder avec un manchon
The PVC sleeve (manchon PVC) is used to connect 2 PVC pipes of the same diameter. It’s a watertight fitting widely used in plumbing. As a reminder, there are 2 types of PVC sleeve:
- Angled sleeves, which connect 2 pipes at an angle (45°, 60°, 90°).
- Straight sleeves, which connect 2 pipes of the same diameter while keeping them perfectly aligned.
Plumber’s tip! Thanks to the sleeve, you can leave an installation on standby. Simply add a drain plug (bouchon de dégorgement) to one end of the sleeve. This allows you to close the pipe and continue the installation later.
- Les manchons lisses: As their name suggests, they are completely smooth inside and out. They simply slide over the outside of the 2 tubes. These sleeves are often used for repairs.

- Les manchons à butée: They have a stop on the inside to allow the tubes to be fitted equally on each side. These sleeves are the most commonly used in plumbing.

Documents techniques unifiés ou DTU: In the building industry, each trade is covered by one or more unified technical documents or DTUs. This is the case for plumbing. Not obligatory in private, but it is on constrution sites.
Plumbing DTU: 60
Gas DTU: 61
Drainage DTU: 64
Normes:
NF P 4X-XXX : Plomberie, sanitaire
L'eau Sanitaire notes
3 bars water pressure ideal for a plumbing circuit.
50 to 60 degrees water coming out of water heater.
Débit de l’eau: litres per second (water circulating in pipes)
The water meter must be supplied by a pipe of sufficient diameter for domestic use, as this pipe will subsequently be reduced each time a water-using appliance is connected (WC, sink, shower, etc.).

The flow rate (Q) (débit) is calculated by multiplying the velocity of the fluid in metres per second (m/s) by the diameter of the pipe used, expressed in square metres (m2).
Q = Fluid flow velocity (m/s) x Pipe cross-section (m²)
A manometer is a device that is screwed onto a tap by means of a connector (raccord sur un robinet). Once the tap is fully open, the manometer displays a precise pressure reading. If the pressure is higher than 3 bars, there is a serious risk of damaging the various sanitary appliances. A pressure reducer should therefore be installed. If the pressure is less than 3 bars, some appliances will not work properly (for example, hydromassage showers requiring high pressure). In this case, a pressure booster needs to be installed.
The speed at which the water flows should also be taken into account. If the network is too fast, there will be acoustic risks (noise in the pipes) and damage to the pipework.
Hot water temperature (too cold, risk légionellose ,too hot, burns): Simply turn on the hot water tap alone and let the water run for 30 seconds to remove any standing water in the pipes. Then use a thermometer to measure the water temperature. The temperature should be 50°C.
The hardness of water depends on the nature of the subsoil from which it is extracted and varies from region to region. Hard water contains a high level of limescale. Over time, limescale clogs pipes and appliances. Consequences: Pressure drops. The water becomes too hot. Solution: install a water softener or an anti-scale filtration system.
The salinity of the water should also be taken into account, as it corresponds to the level of salt and acidity present in the water. Consequences: The pipes are attacked and chemical reactions are triggered. Solution: install filtering systems.
Vanne à boisseau sphérique

he most widely used valve in the plumbing industry. Depending on the position of the handle, it can be open, closed or ajar. It is generally made of brass (laiton), but can also be found in PVC, stainless steel (inox), etc.
Le robinet de puisage

he water tap (Le robinet de puisage), also known as a garden tap (robinet de jardin), is placed outside the home. It is used to manage an external water supply and can be connected to a garden hose, for example. This external water supply can be used for safety purposes, to extinguish an external fire, for example.
La vanne papillon

The butterfly valve operates in the same way as the ball valve. It is widely used for large-diameter pipes.
Le robinet de purge

A drain cock is a valve located on a pipe, usually outdoors. .Bleeding means draining off the water to prevent it freezing in winter and bursting the pipe. To drain, unscrew the cap circled in green. This gives access to a mini tap that can be opened or closed with an Allen key.
If there is too much pressure, the professional will install a pressure reducer (réducteur de pression) just after the general shut-off valve. On the other hand, if there isn’t enough pressure, he will install a booster (surpresseur). A pressure reducer is a device for regulating the pressure in a sanitary installation. It regulates the pressure of the water entering the pipes in the home. One should be installed if the pressure exceeds 3.5 bars. A booster is a machine consisting of a pump that is activated as soon as water is drawn. It is used in the rare cases where the pressure at the last tap is really low (- 0.5 bar). The average pressure in a plumbing installation is generally 3 bar.

When the valve is opened, pushed by the water, the force of the spring becomes greater than that of the diaphragm. The obturator moves downwards and lets the water through. The more you open the tap, the more the spring opens the obturator, the lower the pressure.
A booster (surpresseur) is a device used to increase water pressure. It is installed when the pressure is below -0.5 bar, which is quite rare. It sucks in the water and raises it to the surface thanks to sufficient pressure. The pressure is produced by a motor unit. The basic models consist of a pump that activates automatically when a tap is turned on. The disadvantage of this system is that it is activated every time you open a tap. It therefore consumes a lot of energy.
A sewage pump (une pompe de relevage) is a watertight electrical device with a tank containing floats. When the floats reach a certain level, the pump switches on automatically. Electrical power is used to raise the water and redirect it to the sewer. Les pompes de relevage can be installed inside a home or outside in a sump (a hole dug in the ground). The purpose of the pump is to lift wastewater from one point to another. A non-return valve (un clapet anti-retour) should be installed to prevent any backflow.

A seal (joint d’étanchéité) is a small washer (rondelle) used to prevent leaks in a fitting. In plumbing, watertightness is essential. A slight seepage is bound to become a leak over time. That’s why plumbers use seals. The choice of a seals is based on:
- The diameter of the fitting to be sealed
- Its use (seals do not have the same characteristics whether they are used for water, heating or gas)


Des nappes phréatiques: underground water sources (water tables)
Les schémas de plomberie sanitaires
Le plan de masse: The ground plan is a kind of aerial view of the project. It provides an overview of the entire project. It includes the orientation (points of the compass) as well as the scale (dimensions) and the various connections to the city networks.

Le plan général: The general plan shows the layout of each room in the building, as well as all the information relating to the connections for the various trades (electricity, plumbing, etc.)

Le plan de niveau (useful for plumbers): The plan of level is a drawing to scale seen from above representing :
- The different rooms in a dwelling
- The layout of sanitary appliances
- Their drainage
- The size of pipework to be used
- It’s a good way of getting an overview of the different elements.

Le plan de coupe (useful for plumbers): Characteristics of the section plan:
- It represents a construction seen from the inside.
- The section can be horizontal or vertical.
- This plan details the rooms level by level with the sanitary appliances and their connections.

Le plan 3D: The 3D plan is a plan that allows you to project yourself into a three-dimensional environment. It helps you to understand the location of the various sanitary appliances and even, in a broader sense, to have a more concrete vision of the whole of a home before committing to a project.

BIM: Building Information Model: 3D models of work site
OpenBIM: have a look at downloading this and playing with it. Also look at DALUX to open IFC documents. Also Autodesk Revit. – for sample file, see La démarche collaborative numérique (BIM), last module.
ECS: Eau chaud sanitaire
EFS: Eau froid sanitaire
Example schema representing a octopus plan (un plan en pieuvre) :

The octopus plan is the most commonly used plumbing installation. It is very simple to install. A feeder (the body of the octopus) and various pipes (tentacles) are connected to the various plumbing fixtures.
Example of a schematic diagram showing a plan in a duplex layout (plan en repiquage)

Plumbing acronyms (Les sigles en plomberie):

Hot water is located to the left of the tap. Cold water is to the right of the tap.


Eau Usée EU
Eau Vanne EV
Eau pluviale EP
Chauffe-eau électrique CEE
Eau chaude sanitaire ECS
Eau froide EF
Robinet incendie armé RIA
Ventilation mécanique contrôlée VMC
Ventilation haute VH
Ventilation basse VB
Document technique unifié DTU
Débit Q
Vitesse V
Pression P
Mètre de colonne dʼeau mCE
Section S
Cuivre Cu
Polychlorure de vinyle PVC
Polyéthylène Haute Densité PEHD
Polyéthylène reticulé PER
Pouce “
Diamètre Ø
Professionnel Gaz Naturel PGN
Professionnel Gaz Propane PGP
Robinet à Obturateur Automatique Intégré ROAI
Porte pleine PP
Règlement appel dʼoffre RPAO
Cahier des closes techniques et particulières CCTP
Etablissement recevant du public ERP
Pouvoir calorifique inférieur PCI
Pouvoir calorifique supérieur PCS
Equipement de protection individuelle EPI
Vérificateur dʼabsence de tension VAT
Eau destinée à la consommation humaine EDCH
Pompe à chaleur PAC
Bâtiment et travaux publics BTP
Organisme professionnel de prévention du bâtiment et des travaux publics OPPBT
A structure survey (un relevé d’ouvrage) is a graphic representation of the existing structure. The aim of a structural survey is to transpose the plans for a building, plot of land or dwelling accurately onto paper by hand: sketch, measure, draw and check.
Eco plombier notes
PER: defined by its external diameter and its thickness. A tube of 16 x 1.5 has an internal diameter of 16mm- (2*1.5mm) = 13mm
Most common diameters are 12×1.1, 16×1.5x, 20×1.9, 25×2.3
Also classed by class 2,4,5. 2 is for domestic hot and cold water
Advantages: low cost, easy to use, resistance to high temperatures.
Disadvantages: high thermal dilation, sensitive to UC, 50 year lifespan

Multicouche:
Advantages: easy to use, very resistant
Disadvantages: new, high cost

PPR: Polypropylène random
Easily recognisable as it is green. 2 types, resistant to 10 bars and resistant to 20 bars.
The PPR is assembled by welding, guaranteeing a perfect seal.
Advantages: high resistance, resistance to calcaire and high pressures, long life
Disadvantages: rigid tubes

PVC
PVC EU (grey) used for waste water – eaux usées
PVC EP used for rainwater networks – d’eau de pluie
PVC C used for aggressive liquids
PVC pressure, whose main role is to carry hot and cold water into a dwelling; it is mainly used in collective housing and industrial buildings.
Steel
A galvanised steel pipe: widely used to supply homes in the 1960s, as well as for firefighters’ dry standpipes (colonnes sèches CS).
Stainless steel (inox): used for sink basins or drains because of its decorative appearance.

Today, galvanised steel is not recommended because this type of pipe erodes badly. This erosion hampers the pipes and can lead to them bursting. They are being replaced by new materials such as PER or mutlicouche. Fittings and galvanised steel pipes can be screwed or welded. Welding on galvanised steel is different from welding on basic copper. It is done with an arc or a torch.
The presence of chromium in the alloy makes it resistant to corrosion. Nickel increases its strength and hardness. For example, 18/8 stainless steel contains 18% chromium and 8% nickel. The lower the % of nickel, the more magnetic the alloy, but also less expensive.
Until now, stainless steel (inox) was mainly used because of its decorative aspect (shiny appearance), particularly for sinks and drainpipes. However, it is increasingly used in industry.
La scie-cloche:


First put the scie-cloche on the foret:
First put the scie-cloche on the foret:

Then put on the nut to secure it:

Crimping pliers (pinces à sertir): a tool used to join two parts by manual or electrical compression. On a job, crimps can be used to avoid welds on pipes. This method involves squeezing the skirt of the fitting around the pipe. Crimping is particularly widely used on PER and multilayer installations.


Bi material fittings: As their name suggests, bi-material fittings are used to connect pipes of different materials (for example, connecting a copper pipe with a PER pipe). To do this, you need a brass (laiton) fitting. But, for example, to join a ferrous and a non-ferrous copper and steel pipe, a so-called dielectric fitting must be inserted to reduce corrosion. Most bi-material fittings are made of brass.
Le raccord diélectrique: It is used to join ferrous pipes with non-ferrous pipes. It is THE fitting for water heaters. It prevents corrosion.

La nourrice: It is used to connect several sanitary appliances to cold or hot water from the same point. The water arrives at the feeder via a copper pipe, and is then distributed to the various sanitary appliances via PER pipes.

Automatic or universal fittings: It is compatible with most pipes used by professionals: PER, copper, multilayer, etc. It makes for fast, efficient installation. The pipes are simply pushed into the fitting until a “CLICK” is heard.

Copper: To supply a home with water, professionals most often use copper pipes. The copper network comprises all the pipes that supply water to a home. Copper is considered to be a noble and, above all, very resistant material. It is very attractive and anti-bacterial. The diameter of the copper pipes used depends on the sanitary and heating appliances.
Hard copper Le cuivre écroui:
It comes in the form of a very strong bar ranging from 1 to 5 m. To be bent, it must first be heated with a blowtorch. It is fixed to installations using clamps (colliers). It is used exposed.
Annealed copper (le cuivre recuit):
It comes in coils ranging from 2 to 50 m. The copper has been heated and then cooled, making it malleable and allowing the plumber to bend it cold. It is easy to use and is often used embedded (in trenches), or even directly in the slab surrounded by a sheath.
Sanitary plumbing installation rules are specified in NF DTU standards 60.1 and 60.11, which define minimum diameters for cold and hot water, depending on the different sanitary appliances to be served. Safety and energy efficiency standards for heating systems are defined, among other things, by NF C 15-100. This standard defines the electrical safety rules for the installation of heating control and regulation devices. In particular, it covers the layout and connection of appliances, as well as protection and cut-off devices. Pipes are characterised by their internal diameter and wall thickness. In all cases, their diameter will always be smaller than the diameter of the main supply.

Copper notes
Copper fittings: used to connect copper pipes together. They are used for sanitary plumbing and heating. For welding, clipping or screwing.

Brass fittings: used to connect components made of different materials, for example a copper tube to a tap or a copper tube to a hot water cylinder. Weldable, screwable, threaded on both sides or threaded on one side and weldable on the other


Copper can be from 10 – 40 mm.


Using a copper cutter

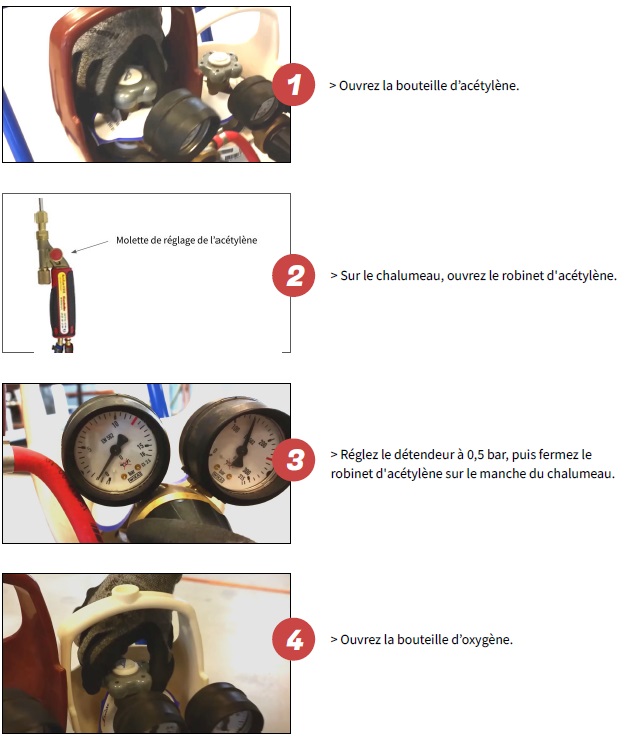
Blowtorch:
- an acetylene cylinder: une bouteille d’acétylène
- an oxygen cylinder: une bouteille d’oxygène

After using:
- Shut off the gas
- Bleed the hoses

3. Unscrew the cylinder adjustment screw to prevent the diaphragms from bursting.

4. Never grease pressure gauges!
Bending pliers (pince à main / cintreuse / pince à cintrer):


Bending (Le cintrage) is the operation of deforming a tube to give it a certain angle using bending pliers (une pince à cintrer).
Bending to 90 degrees:


Bending to less than 90 degrees:


There are 2 main techniques for joining metals in plumbing:
- Joining by soldering or brazing L’assemblage par soudure ou brasure – most used techniques.
- When it comes to plumbing, the only material that can be welded is black steel l’acier dit noir).
- Brazing is used to join identical materials (joining 2 copper pipes) or to connect pipes of different materials (copper and brass, copper and steel, for example). Brazing is achieved by adding another metal (in the form of a rod) called a brazing rod. The filler metal used for brazing is different from the materials to be joined. For copper, for example, a tin rod is used. Brazing involves only melting the filler metal. Brazing almost always requires the use of a flux to make the braze more fluid.
- Joining by mechanical fitting L’assemblage par raccord mécanique
- There are cases where these processes cannot be carried out for various reasons:
- Inability to weld for safety reasons (fire risk), particularly when working in attics.
- Impossibility of draining a system in the event of a leak or pipe conversion.
- The use of solderless fittings will often make it possible to get out of otherwise inextricable situations.
- In these cases, mechanical fittings are used, i.e. screwable fittings used with joints. These installations should be monitored as the use of joints can cause leaks with wear.
- There are cases where these processes cannot be carried out for various reasons:

Copper bends
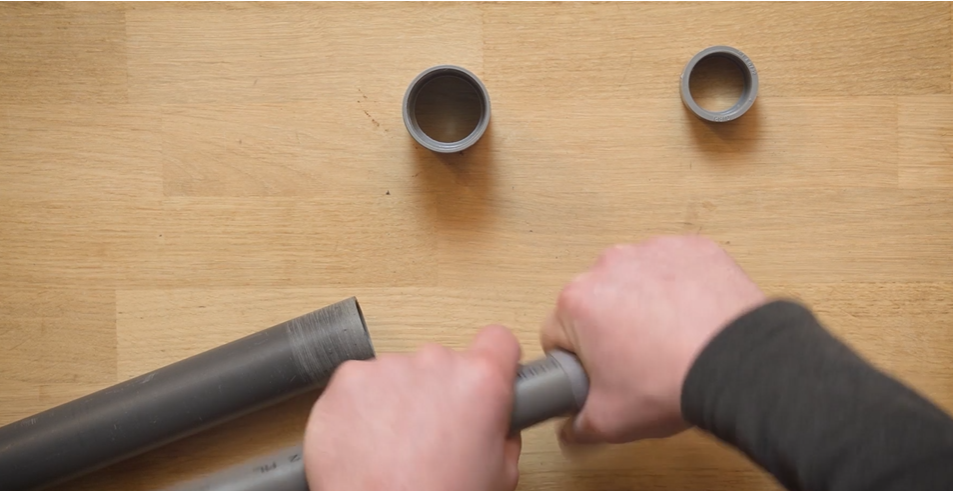
Pince à emboiture


Socket clamps (pince à emboiture) can be used to make connections between pipes of the same diameter, thus avoiding the need to add sleeves, which can be a weak point in an installation.
Socket clamps are mainly used :
- In sanitary plumbing
- For heating when the installations are made of copper
Using socket pliers on copper pipes
- The pliers are very easy to use on annealed copper pipes (cuivre recuit).
- It must be annealed before it can be used on hard copper (cuivre écroui), as the tube is rigid and therefore liable to crack.
It must therefore be made malleable.
How do you do this?
- Heat the end of the tube with a blowtorch to a dark red colour.
- Cool the tube by immersing it in a bucket of water.
- You can then use the socket pliers to widen it.
The use of socket pliers is prohibited on :
- Copper pipes carrying gas
- Pipes carrying refrigerant.
With a socket, you don’t need a sleeve, so you don’t have to weld. It is therefore a more economical technique. This is a very common plumbing operation and easy to carry out, but it requires precise, good quality equipment.


The bayonet (la baïonnette) is a geometric shape made in plumbing and heating on copper to avoid an obstacle or wall.
To make it, you need to make an elbow and then a counter-elbow with corresponding angles. This gives a parallel offset.
The bayonet is more aesthetic and prevents soldering. The angle of the bends to be made depends on the length of the offset.


The “chapeau de gendarme” or tube jump is a design that allows the professional to avoid an obstacle, an evacuation, another tube, etc.
- This figure is created by bending.
- The hat consists of a large curve in the centre and two counter-curves on either side. The professional must know how to master this technique as it is often used.

Measure:


A dessautage or ¾ de chapeau de gendarme is the action of passing one tube over another by making a copper piece.
- This makes it possible, for example, to pass a cold water tube over a hot water tube, avoiding it.
- On an exposed installation, this is an aesthetic way of connecting copper pipes together.


More copper notes
The layout of wet rooms (pièces d’eau) in a home is very important for comfort.
It’s the plumber’s job to design the best possible layout for these rooms, particularly when a property is being built and/or renovated. In this case, he will be a good adviser.
The aim is to create layouts that respect :
- Sound comfort to limit noise
- Spatial comfort, so that users can move easily and freely around the various elements.
- “Health” comfort (watertightness of floors, ventilation, etc.).
To achieve this, there are a few logical rules to follow. Water rooms must comply with the following requirements:
- These rooms must be as close together as possible.
- The various elements must be positioned close to the existing drains.
- WCs should be positioned as close as possible to the water column.
- The kitchen, bathroom and shower must be adjacent to each other to facilitate pipework.
- The water heater must be close to the hot water tapping point.
- If possible, buffer spaces (cupboards) should be inserted between shower rooms and other rooms, particularly bedrooms.
- Installation of sufficient ventilation.
- Waterproofing of floors.
- Tiling of surfaces around showers, baths and above washbasins.
- Consideration of available space.
Recommended distances (in tight spaces can be reduced):


La matrice (The die)
This is a tool used to bend the ends of copper tubes.
It looks like a vice with several holes corresponding to the different diameters of the copper tubes.
It is used to clamp the tube before using the router and a hammer to make the collar.

La toupie (The router)
This is the second essential tool for making a beaten collar. It is a conical tool that is placed in the copper tube. By tapping on it with a hammer, the edge of the tube flares out. This flaring creates a rim on which a seal can be fitted.

Collet battu (beaten coller)
To connect a copper pipe to a washing machine tap or a valve, the plumber can use a loose nut or a 2-piece fitting, but he can also make a collet battu himself to avoid soldering.
- The collar, or captive nut, is one of the fittings most commonly used by plumbers.
- It refers to the end of a pipe that is flattened outwards.
- This collar forms the seal support for a nut previously threaded onto the pipe, which can be screwed onto a stopcock or valve.
- The beaten collar requires no welding, only know-how.


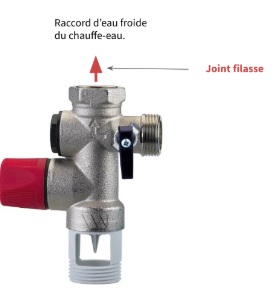
Le joint filasse is used to make a seal between two fittings, one male and one female, both of which are fixed.
It is made on the male part of a fitting using yarn (la filasse – fibre de lin).
This is usually supplied in reels. It is tightened around the male fitting in a clockwise direction.
Sealing paste (la pâte d’étanchéité), which is deposited around the filasse.
Only to be used on brass fittings.. Used for fittings that need to last a long time (raccords douches, vannes, arrivées d’eau générale…).


La nourrice, also known as a clarinet (because of its shape), is a connector attached to the water inlet pipe and fitted with several connections to supply water to different points in the home.
It is used in particular to connect the various elements of a bathroom.
All the hot and cold water pipes run from the nourrice to connect the various sanitary appliances.
There are always 2 manifolds in a system, one for hot water and the other for cold water.
The manifolds can be :
Commercially purchased, in which case they will be made of brass.

Professionally made by assembling copper tubes.


To plug a pipe that will no longer be used or will be used in the future, you can cut and clamp it to put it on standby, while keeping it watertight. This solution is reliable even if it may lack aesthetic appeal.


La soudure notes
Le décapant: Adding décapant to your soldering rod before soldering not only liquefies the filler metal but also cleans the surfaces of the metals to be joined. Décapant is not compulsory for copper/copper soldering, but is strongly recommended. On the other hand, for brass/copper soldering, décapant is compulsory. Décapant is often in powder or paste form. All you need to do is heat the brazing rod with a torch, then dip it in a pot of décapant to thin the solder and clean any residue from the pipes and fittings.

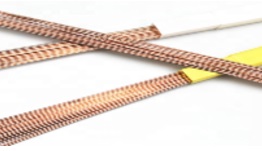
To carry out a soldering joint, the plumber needs, in addition to his torch, soldering rods (baguettes de brasure) also known as filler metal (métal d’apport).
The role of the rod is to provide the metal that will make the junction between the two parts to be soldered. To solder copper tubes or copper/brass parts, the plumber is obliged to use brazing rods. Depending on the type of solder to be used, the soldering rods will not be made of the same material.
La brasure forte (Brazing): brazing at a temperature above 450°.
For this type of brazing, you can use a single-gas torch (butane/propane mixture) or a two-gas torch, such as an oxyacetylene torch (oxygen/acetylene).
La brasure tendre (Soft soldering): soldering carried out at a temperature below 450°.
For this type of brazing, you can use an oxyacetylene torch, a small single-gas torch or even a soldering torch.
Brazing aluminium and its alloys
- Using aluminium rods
- Use a low-temperature torch, otherwise there is a risk of melting the aluminium

Soldering copper
The plumber has two options:
- Use copper-phosphorus rods for “strong” soldering
- Making “soft” welds using tin solder

There are also commercially available brazing rods (baguettes de brasure) already coated with décapant. They are more economical and can be used to solder different metals such as brass, copper, steel, etc.

Recommended solder for gas work
When welding on gas pipes, we recommend using silver phosphorus brazing rods. They are used to braze copper and copper alloy gas pipes.


Le pare-flamme is a protective device that prevents the plumber from burning walls and floors when carrying out his welding. Le pare-flamme is used on exposed welds or on finished work sites. Le pare-flamme is made of silica fibre or fibreglass.

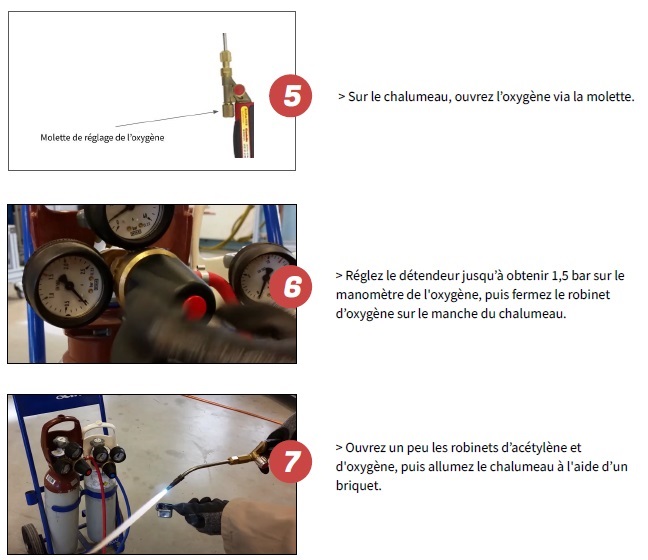
Lighting the blowtorch


Soldering:


Soldering copper with copper
To solder copper, you need to:
- Fit the pipes or fittings tightly together
- Heat until the tube is a “cherry red” colour
- Place the welding rod or filler metal that will make the joint and therefore the seal
- To make the welds correctly, you need to set your torch at 700° or above.
Soldering copper with brass
To solder copper and brass, you need to :
- Master the adjustment of your torch.
- Add a stripper to clean and facilitate soldering
- If the torch is incorrectly set, there is a high risk of melting the fitting. As a result, the weld will not be watertight and you will have to start again.
Maintenance of sanitary circuits notes
Connecting a valve (une vanne) makes it possible to isolate all or part of a sanitary network without having to cut off the general water supply.


Le piquage à bord relevé (raised-edge tapping) is a technique for inserting a smaller-diameter pipe onto a larger-diameter pipe without using a fitting. This makes it possible to create an additional outlet on a pipe to supply a sanitary appliance, for example.
Advantages of creating a raised-edge tapping :
- Thanks to this technique, you don’t need to buy a tee off the shelf.
- You only have to make one weld instead of three.
Raised-edge tapping is an operation often carried out by plumbers on site. You’ll need to train yourself to master this technique so that you can make high-quality spigots.
There are 2 techniques for making a junction. You can use either une pince à emboîture, or une broche de plombier (this technique is used much less frequently than it used to be).

Piquage à bord relevé avec une pince à emboîture

Piquage à bord relevé avec une broche de plombier

Repair a leak in copper piping:


A disc grinder (une disqueuse) is a portable tool on which a disc is mounted.
This disc can be abrasive on the face or edge for sanding or cutting. The disc on a grinder is removable, and you choose the material depending on what you want to use it for (polishing, cutting, brushing) or the material you plan to use it on (brick, breeze block, concrete, tiles, etc.). Plumbers can use the disc grinder to grind or cut hard materials such as concrete, cast iron, metal, etc.

In case of leaks:
Visible leaks:
- Tap leaking:
- Tap dripping: Replace any leaking parts. If the tap is cracked, replace it completely.
- The mousseur no longer does its job: Remove the mousseur and clean it. If it is cracked, change it.
- WC
- If the float is no longer doing its job properly, change it.
- The tank seal: Remove the cistern, clean or change the seal so that the water stops constantly running into the bowl.
- The water inlet tap: It may be scaled. If so, turn off the water and clean or replace the tap.
- Toilet drainage: If there is a leak under the toilet, start by cleaning the seal. If that doesn’t work, replace the toilet as soon as possible.
- Leaking pipe
- Faulty weld: Turn off the water quickly, drain the system and re-solder or re-solder a small part.
- Faulty fitting: Quickly turn off the water, drain the system, change the fitting and reseal the joint.
- Underneath a sink
- Hose seals: Turn off the water in the housing and change the rubber seals on the hoses.
- The siphon: If the siphon is leaking, it may be clogged or broken. Remove it, clean it and replace it if necessary.
- Connection bolts: Check that the hoses are properly connected to your fittings. Check that they are not loose.
Hidden leaks:
- Water leak in a wall
- Faulty pipe: The dampness tester can be used to find out where the wall is at its dampest, which is usually the source of the leak. Open the wall/ceiling and see if the leak is still there. Either you will be able to resolve it, or you will have to redo part of the installation which is a lot more costly.
- Water leak at neighbour’s: If you find that the leak is coming from the neighbour’s premises: inform your
of your diagnosis and let the neighbour’s professional take care of it.
- Leak in a concealed pipe
- Freezing, use, ground movement: On a buried pipeline, you may have to replace pipes that have potentially been damaged by ground or weather conditions. To do this, you’ll have to dig to find the leak and repair it.
Showers and built-in systems (Les douches et les réseaux encastrés) notes
On chantiers en encastré, plumbers must protect their pipes with protective sleeves (gaines de protection), also known as ringed sleeves (gaines annelées). These sheaths protect the pipes from corrosion and also contain the heat in the pipes. Concealed pipes can become blocked by concrete or cement, so it’s important to protect them. This avoids the heavier work of dismantling them in the event of a leak.

Plumbers use 3 main types of pipe for concealed pipework:
Copper: Copper is the most commonly used material for plumbing pipes. Despite all its advantages, it can be prone to corrosion. It must therefore be protected by a copper pipe sheath.
PER: Sheathed in red for hot water and blue for cold water, PER, meanwhile, is subject to thermal expansion (when temperatures are high, its volume increases). It must therefore also be protected by a corrugated sheath.
PVC: Like PER, it is subject to expansion. It should therefore also be protected by a corrugated sheath.
Gâcher de la colle (gauging glue) means diluting glue with water. When the plumber makes trenches in the walls to embed pipes, he has to fill them in to fix the pipes in question. To do this, he uses glue. You need to know this technique in order to work properly and cleanly. What’s more, you’ll make the work easier for the person who comes behind you, such as the painter or carpenter.
Une tranchée (a trench) is an excavation made in the ground or in a wall to allow pipes or conduits to pass through.
On a building site, plumbers may have to lay supply or drainage pipes in trenches. Creating trenches makes it possible to create installations without visible pipes and therefore more aesthetically pleasing. Making trenches is a step that should not be neglected. You’ll need to ensure that your trenches are the right size to accommodate the pipes perfectly.


Sealing pipes (Sceller des tuyaux)


The customer chooses his or her taps according to his or her desires, but there are standards that must be respected during installation. Shower taps should be installed between 110 cm and 120 cm above the floor. Bathroom washbasin and washbasin taps should be installed between 85 and 90 cm from the floor.

Installing sanitary appliances notes

Installing a mixer


The components of the shower column have already been chosen by the customer. The plumber is already familiar with them, and needs to know in advance whether the shower column is to be concealed or exposed. He also needs to know whether the taps can be installed with a centre-to-centre distance of 15 cm, the current standard, or whether a different distance is required.
Drilling tiles:

The metal expansion plug (Molly): designed for heavy fixings to plasterboard, stud walls and hollow bricks. Requires prior drilling and the use of expansion pliers

The plastic expansion plug: designed for all types of substrate: concrete, plasterboard, breeze block, etc. Requires pre-drilling

The knock-in plug: can be fixed to walls thanks to its split structure, which opens and locks into the material when the screw is driven in with a hammer. Ccan be used for solid or hollow supports. Generally used for fixing cleats. Requires pre-drilling

Screw-in plugs: does not require pre-drilling. Only used to fix light weights to soft, hollow substrates

Electricity notes
An electric current is a movement of electrons in an electric circuit. To make these movements, we need a source of electrical energy (a generator) that will create the movement of these electrons.
The movement of the electrons can be stronger or weaker. The electrical voltage refers to the force of the movement produced by the electrons. It is expressed in Volt (V) and symbolised by the letter U in electrical diagrams.
The higher the electrical voltage, the stronger the current, and therefore the more powerful the receiver. Let’s take the example of a lamp
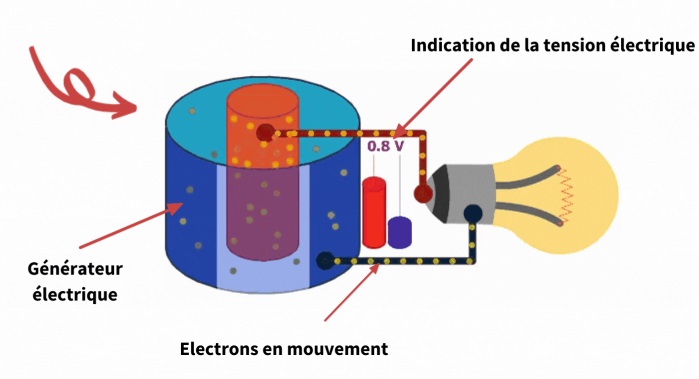
Voltage also refers to the difference in electrical potential. In short, it refers to the electrical height between two points.
Caution: The conventional direction of electric voltage is the opposite of that of electric current. The voltage will therefore be higher at the negative terminal and lower at the positive terminal.

An electric current is a movement of electrons in an electric circuit. The intensity of an electric current refers to the quantity of electricity that flows through the electrical conductor for one second. It can be compared to the flow of water in a river. The unit of measurement for current intensity is the ampere, denoted A. Current is also symbolised by the letter I on electrical diagrams.
Electrical power is expressed in watts (W) and is symbolised by the letter P. P=U*I = volts * amps
The wattmeter has terminals that are connected differently depending on the quantity to be measured:
Connection in series > for measuring current
Parallel connection > is used to measure voltage
An electric circuit is made up of 4 essential elements:
- A generator which supplies the electrical energy. A battery, a solar panel, etc.
- A receiver which consumes the electrical energy and transforms it into another form of energy. A lamp, radiator, fan, motor
- Conductors that transport electrical energy (electric cable).
- Control equipment which controls the stopping or starting of receivers. Switch, push button, etc.
The electric current always flows from the positive (+) terminal of the generator to the negative (-) terminal of the generator.

Since 2016, electrical installations on new, renovation or extension projects must comply with French standard NF C 15-100.
Equipotential bonding connects the pipes and all the metal, and therefore conductive, parts of a building to earth in order to prevent electrocution:
- Domestic hot water pipes
- Waste water
- Gas
- Metal elements (beams, metal windows, etc.)
- Metal sanitary equipment (washing machines, baths, etc.)
- These equipotential connections are invisible in dwellings but essential for safety.
There are two types of equipotential bonding:
- The main one, which is compulsory and generally located at the entrance to the home.
- The secondary or local equipotential bonding, which is present in the interior rooms of the dwelling, particularly the wet rooms.

Stripping a wire

Domino connectors
- enable two or more electrical wires to be joined together by tightening.
- widely used for electrical installations
- less and less recommended because they tend to unscrew over time
can make it difficult to measure screw tightening torque

There are two possible scenarios with these connectors:
- if the screws are tightened too much, the wires may break
- if the screws are not tightened enough, arcing can occur and cause damage (short-circuits, overheating, electrical insulation problems, etc.).
Automatic terminal type connectors
- allow two or more electrical wires to be linked by means of a spring or lever: the wire is pinched and thus creates an electrical contact
- more compact and take up less space
- sizes vary according to the number of wires to be connected
- more secure, as no screws are required
It’s important to be familiar with these different components before using them. Once connected, the wires are very difficult to remove from the connector.
Automatic terminals are increasingly replacing the traditional dominos in electricity. This is because of their many qualities and the enhanced safety they offer!

Using a domino

Cutting electricity

Boiler notes
The safety group is a compulsory device to ensure the safety of the hot water tank. It must comply with NF standards, which guarantee its quality.
The safety group has 3 main functions:
- To maintain the pressure of the hot water cylinder at less than 7 bars.
- Cut off the cold water flowing into the cylinder
- To prevent pressurised hot water from flowing back into the cold water circuit.

Replacing a safety assembly
- Switch off the power supply.
- Turn off the cold water supply to the appliance.
- Drain the tank. Be careful at this stage as the water will run out, so have a bucket ready to avoid flooding!
- Remove the joint fillasse from the cold water connection.
- Replace the joint fillasse.
- Replace the groupe (safety assembly).
- Once the unit has been tightened, re-pressurise and test for leaks.
- Once the tank is full, turn the power back on.
When installing a hot water storage tank, you also need a safety group. This is compulsory on a hot water cylinder. It has three functions: as a safety valve, to prevent hot water from entering the cold water circuit, and as a shut-off and drain valve.
It is also highly recommended to install a pressure reducer, whose role is to regulate the pressure of the water heater and keep it below 3 bars.

Installing a hot water heater


Le bouclage sanitaire en eau chaude or boucle ECS
Domestic hot water looping, also known as DHW looping or looping, is a device that allows the occupant of a dwelling to enjoy hot water as soon as the tap is turned on, without having to wait for the few seconds or minutes of latency usually required for the flow of cooled water present in the pipework.
The loop is operated by a domestic hot water circulator. The domestic hot water circulator is a circulation pump that redirects the unused hot water in the pipes to the hot water cylinder.


Maintenance notes
A plumbing diagnosis focuses on the 5 points listed below:

State of the boiler
- This is the first diagnosis to be made.
- This is the most expensive component to repair or replace in the event of a fault.
- After checking that there are no leaks, ask your customer when the water heater was installed and how it has been maintained to get an initial estimate of its condition. The lifespan of a water heater is between 10 and 15 years.
- Note: replacing a water heater costs around €1,000, which varies according to capacity and operating mode.
Leaks
- These are the plumber’s greatest enemies.
- During the diagnosis, the plumber will have to check that they are not present and track them down on taps, pipes, sanitary appliances, mixer taps, WCs and the various pipes.
- You can also use the water meter to help you, and take a reading when you arrive and at the end of your visit. If you notice a large difference between the readings, you should suspect a leak.
Condition of gutters and marks on walls or ceilings
- You can tell at a glance whether your home is prone to water damage. Just look for traces of mould on the walls or ceilings.
- These marks may be indicative of seepage.
- A look at the gutters and their casings is also necessary to check that they are not blocked or broken.
State of the tiles
- Tiling is one of the elements you need to check.
- If the tiles sound hollow, there may be a leak, which could result in water damage to the neighbour’s property.
External piping
- This is the final stage of the plumbing diagnosis.
- External pipes belong to the home as soon as they are located after the water meter.
- The plumber must therefore carry out tests on these pipes.
- An incorrect diagnosis can lead to sewer back-up in the home, or even flooding.
7 step maintenance
To set up maintenance, the following 7 steps must be followed:
- Draw up a list of equipment
The maintenance team must have an exhaustive list of all the sanitary appliances requiring maintenance. A notebook listing them is drawn up. - Draw up a theoretical investigation schedule
Depending on the characteristics of each piece of equipment, an inspection schedule is drawn up. The schedule makes it possible to establish regular or periodic maintenance depending on the frequency of use, condition and age of each piece of equipment. - Investigate. At this stage, the maintenance team goes round all the facilities to make a concrete inventory of all the equipment. A new notebook is opened, detailing all the work already carried out and its duration, any repairs already carried out, the condition of the machines, their maintenance or even replacement, and the need for repairs.
- Draw up a maintenance schedule. Following the survey, this stage enables the theoretical schedule to be readjusted and a definitive schedule to be drawn up. Taking into account the condition of the equipment, regular visits and checks are scheduled at regular intervals.
- Estimating the equipment. Once the maintenance programme has been finalised, the maintenance team draws up a list of the equipment it will need to deal with any breakdowns or faults as quickly as possible.
- Implement. Once all the equipment has been recovered, the maintenance team can carry out the various repairs that have been established. When maintenance is complete, an inspection service is responsible for checking that everything has been carried out correctly and is ready to operate again.
- Updating equipment files. Following each check and intervention, the technicians in charge of maintenance draw up an exhaustive report of their work. This report provides an up-to-date inventory of the installations.
Problems: boiler

Boiler leaking
Vérifiez d’où vient la fuite
- The leak is visible, the casing is damaged
- Check the tank for deformation or holes in the casing
- Change the boiler
Vérifiez les organes de sécurité
- Check that the valve is not leaking
- Check that the fibre seals are not leaking
- Check that the water supply seal (joint filasse) between the storage tank and the groupe is not leaking.
- Check the dielectric connection between the cylinder and the hot water supply
- Change the faulty parts!
Fuse tripping
Vérifiez le disjoncteur
- power supply / panel
- Check that the circuit breaker withstands 25 amps
- Check that the meter has not tripped
- Be careful, handling the switchboard is the electrician’s job!
Vérifiez que les fils sont reliés au thermostat
- check that the phase/neutral and earth connections are correct
- check that the wires are not stripped
- check that the electrical connectors on the underside of the balloon canopy are not damaged.
- Make the connections!
Vérifiez le niveau de tartre sur la résistance
- If the previous actions have had no effect, then it’s tartar!
- A scaled boiler will never turn on. A storage tank with limescale will trip.
Water not heating
Vérifiez l’alimentation électrique
- Make sure the storage tank has a power supply!
Vérifiez l’alimentation d’eau
- Make sure that the storage tank is supplied with water
- Make sure that the supply valves and valves on the unit are all open.
Vérifiez le fonctionnement de chaque partie chauffante du ballon
- Check the resistance
- Under the balloon cover, check the diode that switches on the resistor.
- If the light is red and there is no hot water, change the heater.
- Le thermostat
- If everything else is fine, the problem is with the thermostat.

The cylinder has exploded
A hot water cylinder can explode. If this happens, you should immediately:
- Turn off the water
- Drain the tank.
- Change it.
A balloon can explode when:
- The safety group has not been opened. As it heats up, the tank deforms and opens.
- The safety group is faulty. The pressure becomes too high in the tank (a tank explodes when the pressure reaches 20 bar).
The tank is scaled
- When the cylinder is scaled, its ability to heat water is reduced.
- Scale, in the form of a white film, is the tank’s enemy because it sticks to the heating element.
If a heating element has too much scale :
- The water no longer heats up.
- The fuse at the meter trips.
It is possible to repair the cylinder without changing it.
To do this:
- Switch off the electricity to the cylinder.
- Drain the tank.
- Remove the heating element and clean the scale in the cylinder by hand.
- It is advisable to change the element before reheating the cylinder.
The thermostat no longer works
- The cylinder may no longer be producing hot water even though it has a power supply.
- It is possible to replace the thermostat without having to change the hot water cylinder.

Installing a sink


Raccorder une vidange


Toilets notes
Toilets
The tap leaks
On a washbasin, the most common breakdowns are often due to a problem with the fittings:
- Cracked tap
- Defective mousseur
- Leak between basin and tap
The plumber has several solutions: he can repair or, if that’s not possible, replace.
There’s a leak under the washbasin
- The siphon is leaking because it’s cracked or blocked.
It needs to be changed.
- The tap hoses are faulty.
The rubber seal or hoses need to be changed.
There is a puddle under the washbasin
If a leak is identified on a pipe under the washbasin:
- Turn off the water.
- Drain the system.
- Replace the faulty fitting or re-weld it if possible.
- Apply pressure again to check that the leak has been repaired.
The washbasin is blocked
This is a very common request for a plumber. There are several ways of unblocking it, in order try:
- Use a pump.
- Dismantle the siphon and clean it.
- Use a ferret.
Protocol for finding the problem:

Classic WC

Sanibroyeur

Suspended toilet

Adaptable sanibroyeur

Compact sanibroyeur

- A standard WC can be drained vertically (i.e. under the toilet) or horizontally.
- Standard toilets are connected to the drain using a 100 mm drain pipe. They are also connected to a water inlet so that they can be flushed.
- Where standard toilets cannot be installed due to lack of space, plumbers may install sani-broken toilets.
- Sani-crushers are equipped with an electric motor that crushes and discharges the waste into the pipes, which are further away than traditional toilets.
- To connect a sani-crusher, you need a water inlet to connect the drain and an electrical socket to connect the motor.
- The sani-crusher is a box placed behind the toilet that will send the waste to the drain.
- A sani-crusher can be adapted to low-slope systems and a drain pipe of less than 100 mm located at a rather long distance from the drain.
Warning: only toilet paper should be thrown down the sanibroyeur, otherwise there is a very high risk of it clogging up.
- A plumber may also have to install urinals.
- Urinals are toilets that are more commonly installed in places open to the public.
- They are installed in the same way as wall-hung toilets.
- The shape of urinals is different, but they function in the same way as a conventional WC. They consist of a bowl, a manual or automatic flush and a drain.
Installing a toilet – preparation


Installing a toilet – hooking up the evacuation

Installing a toilet – hooking up the cold water


Installing a toilet – the finitions


To install a toilet correctly, the following points must be observed:
- Read the instructions.
- The axis of the pipe must be 18 cm from the floor.
- The slope of the waste pipe must be 1 to 2 cm if the waste is short (less than 2 m), and 2 to 3 cm if the waste is more than 2 m away.
- Wait for the painter and/or tiler to pass before finishing.
Repairing a WC
The float is faulty
This is the part that controls the filling of the tank with water. If the float is faulty, it allows water to pass through and run continuously into the bowl. The float is the main part that is changed when a toilet is repaired.
- The float no longer rises.
- The valve is damaged.
- Replace it.
The tank seal is faulty
The seal that is responsible for making the junction between the tank and the bowl may be leaking.
- The seal is leaking. It allows water to flow continuously into the bowl.
- Clean it or replace it.
The tap seal is faulty
The small water inlet tap may be leaking, due to limescale or age.
- The tap is leaking.
- Change the seal or tap if necessary.
The most important thing is to turn off the water before doing anything.
There’s a leak under the toilet
It may be due to :
- A defect in the lip seal between the pipe and the WC.
- Remove the toilet and change the seal.
- A crack in the bowl.
- Repair with putty if possible or change the WC.

Unblocking a blocked washbasin or shower:
- Put a small suction cup on the pump and place it in the drain.
- Gently slide the piston, accelerating gradually.
- If you feel resistance, it’s working.
- Once the plug has been dislodged, a noise can be heard.
- Run water to remove any remaining clog residue and clean the pipe thoroughly.
- If the clog is still there, repeat the operation several times.
Unclogging a toilet:
- Put a small suction cup on the pump and place it in the bung.
- Place the unblocker as low as possible in the bowl.
- Pull the handle firmly so that the clog rises.
- Flush and check the result.
- If you don’t see any change, try again.
Gas notes
Le furet
The ferret consists of a flexible wire cable and a crank, handle or grip. It has a drill or corkscrew tip, which can be used to pierce blockages.

To use a ferret, proceed in stages:
- If necessary, dismantle the siphon to make it easier to insert the ferret.
- Be careful to keep all the trap’s parts and seals so that you can reassemble it at the end of the unblocking operation.
- Insert the corkscrew end into the blocked drain.
- Turn the handle to extend the long stem into the drain. The handle turns a worm, twisting the wire in a spiral to unclog the pipe.
- Take the ferret out often to clean the corkscrew-shaped end so that it doesn’t lose its effectiveness.
- When the obstacle is encountered, continue to gently deploy the ferret to clear the passageway.
- Repeat the operation several times to make sure the blockage is broken.
- Once the plug has been broken, refit the siphon if it has been dismantled.
- Check that the plug has disappeared by filling the tray with water.
- If the water drains normally, the plug has gone.
- If this is not the case, repeat the operation using the ferret.
- Also check that the siphon is back in place and that there are no leaks.
Gas appliances
A room housing a gas appliance must:
- Measure more than 8 cubic metres
- Have a window with an opening of at least 0.40 square metres.
Ventilation
- Water heaters produce combustion fumes that must be evacuated.
There are various systems for evacuating these fumes:
- The appliance is connected to a VMC. The fumes are evacuated by the dwelling’s VMC, although a minimum space of 1 cm must be left under each door.
- The water heater is connected to a chimney flue. In general, these water heaters are installed on the floor and the flue is connected directly to the chimney flue.
- The gas water heater is fitted with a flue system. The water heater draws in the air and exhausts the combustion fumes via a single flue. This duct leads directly outside.
The location of the flue outlet must comply with a number of rules: it must be :
- 60 cm from any other air intake
- 30 cm from the roof
- 30 cm from a balcony
- 40 cm from an opening
- 15 cm from a 90° wall
Evier vs lavabo
Un évier de cuisine est différent d’un lavabo ! Même s’ils se ressemblent en termes de conception, les éviers de cuisine sont plus grands et sont destinés à des tâches davantage “ménagères”, contrairement au lavabo qui permet de se laver les mains
Installing a kitchen sink
Step 1: Preparation
- Place the sink upside down in the desired position on the worktop.
- Trace the outline of the sink on the worktop.
- Measure the space between the fixing lugs and the edge of the sink (usually 2 centimetres).
- You’ll get a second circle (or rectangle, depending on the shape of your sink) inside the first.

Step 2: Cutting
- Drill 2/3 holes along the contour of the second circle with a drill so that you can insert the jigsaw blade.
- Cut out the outline of the second circle using a jigsaw.
- Remove the cut disc.
- Check your work by inserting the sink into the hole.
- Readjust with a file if necessary.
Step 3: Installation
- Apply a bead of silicone around the sink.
Calcaire
The minerals in hard water crystallise on contact with heat. When hot water circulates through the plumbing system and sanitary appliances, the minerals in the calcareous water solidify, transforming into limescale and creating whitish deposits. These clusters of scale are deposited all along the hot water’s path through the pipes, clogging them. Smaller pipe diameters reduce the efficiency of the installation.
Scale also affects sanitary appliances and domestic appliances through which hot water circulates.
Good maintenance of pipes and sanitary appliances can reduce the risk of limescale forming.
- Descale your hot water tank every 5 years or so.
- Install a water softener: this purifies the water by neutralising calcium and magnesium ions and replacing them with sodium ions. In so doing, it directly removes the cause of limescale by eliminating it.
- Install an anti-limescale filter: simpler to install than a water softener and less expensive, the anti-limescale filter retains the limescale. It does not, however, remove it.
Baths and silicon notes
The anti-sediment filter is an installation that effectively combats the sand and sludge (urban and industrial) that is deposited in pipes during roadworks. Without an anti-sediment filter, sand can spread to the various sanitary appliances in a system. The filter consists of a plastic cup fitted with a nylon or cotton cartridge that will hold back impurities and keep them suspended in the water. The filter is installed directly on the water pipes. It is advisable to install it with a bypass. It should be placed directly on the water inlet.
The anti-scale filter keeps limescale particles in suspension. Note that the limescale is not removed from the water, it is only kept in suspension, which prevents it from settling in the pipes. There are 3 types of limescale remover:
- Chemical limescale remover
- Magnetic scale remover
- Electronic anti-scale
The water softener purifies the water by neutralising calcium and magnesium ions and replacing them with sodium ions. In so doing, it directly eliminates the cause of limescale. The softener consists of a control box and two tanks. The first tank contains mineral resins with sodium ions and the second contains regenerating salt. Initially, calcium and magnesium ions stick to the resin and are exchanged for sodium ions. As soon as the resin is saturated, it needs to be recharged with sodium ions using the regenerating salt. The softener therefore uses a chemical ion exchange process. It must be placed directly on the water supply. The softener needs to be installed in bypass mode, so that it can be serviced if necessary. The regenerating salt should be changed regularly to maintain its effectiveness.
Bypass
- Bypass means contournement. This device is used to isolate another appliance that needs to be serviced or replaced, without having to cut off the entire installation. It is located at the beginning of the installation, near the water inlet.
- The bypass creates a parallel circuit, giving a secondary circuit alongside the primary circuit. The valves must be well placed so that the circuit can be isolated without having to shut everything off.
- The bypass operates as follows: In normal operation, the sanitary appliance is on. The water passes through the sanitary appliance filter. In the alternative position, the water no longer passes through the appliance or the filter. It passes through the parallel hot water circuit.
- The various water treatment appliances can be affected by limescale or scale, but thanks to the installation, it is possible to change their filter or cartridge without having to turn off the water to the whole house.


An emporte- pièce
An emporte- pièce (cutter), or découpe évier (sink cutter), is a tool that allows the plumber to make a hole in a stainless steel sink in order to insert a tap.
- It makes a clean, burr-free cut to suit the diameter of the tap.
- The diameter of a sink cut-out is standard, i.e. 35 mm.
- With this tool, the plumber can make holes in stainless steel plates 2 mm thick.
- It is not possible to use a sink cutter on a wooden worktop, the hole will be made using a scie-cloche (hole saw).

Baths
- To connect the bath drain, the plumber can use 50 mm or 40 mm PVC pipes, depending on the length before the drain or siphon.
- The height of the bath should be between 53 and 57 cm, but this also depends on the drain. The various standards can be found in DTU 60.1.
- The bath’s taps will either be recessed 75 cm from the floor, or placed on the shower column or bath.
Installing a bathtub
- Turn off the water if the circuit is under pressure and drain the system.
- Fit the feet and adjust them level.
- Place the bathtub in its future location, checking that it is level and horizontal.
- You may or may not need to fit tasseaux (cleats) to help hold the bath in place so that it doesnʼt bend.
- Lay the bath. It must be perfectly level and rest firmly on its feet.
- Connect the overflow, drain and plug.
- Fit the bathtubʼ (habillage) cladding, not forgetting the inspection hatch (trappe de visite).
- Test the bathtub and if it works well, make the silicone seal.
Installing a balnéo bathtub
- Turn off the water if the system is under pressure and empty the installation.
- As with the free-standing bath, you must start by laying the feet of the bath.
- Measure the height and lay braces to help support the bath.
- Once the bath has been laid, you need to connect it electrically. To do this, an electrician must intervene and take care of the electrical connection.
- Once the bath has been electrically connected, connect the drain.
- Connect the taps.
- Put the bath back under pressure and carry out the watertightness tests.
- Apply silicone to prevent leaks.
Silicone
- Making a silicone seal is a crucial step in finishing a wet room.
- The silicone seal creates a watertight seal between two parts exposed to water: tiles/sink, worktop/sink, etc.
- It is also an aesthetic element.
- Installing a seal is a simple operation, but one that requires good dexterity.
- You will very often be asked to make silicone seals, whether on new installations or to replace old damaged seals.
Loading a silicone gun

Applying silicone to a new installation

Replacing a silicone joint

Repairing baths and showers notes
Repairing baths and showers
The tap leaks
On a shower or bath, the tap may be faulty.
- The tap may be cracked.
- The aerator may be faulty.
- The leak may also be between the bath or shower tray and the tap.
- In all these cases, either repair if possible or replace the faulty part.
There’s a puddle under the shower or bathtub
Where there’s a puddle, there’s a leak!
- The first and most essential thing to do is turn off the water.
- Then drain the system.
- Tighten the fitting if possible, or replace it.
- For a leak under the bath, access the leak under the inspection hatch.
- For a shower, break and remake the tray.
- Don’t forget, once the leak has been repaired, to turn on the pressure again to check that everything has been repaired.
The bath or shower is blocked
When a bath or shower is blocked, the plumber has several solutions:
- Use a pump.
- Use a drain or change the bath trap.
- In the shower, the trap is often inaccessible, so the drain is the only solution.

Réaliser un filetage
Threading is a step that plumbers may come across during their work.
- Threading is a technique used to make helical threads on a metal rod. It allows the plumber to connect stainless steel or galvanised steel pipes. More specifically, it is used to screw on nuts or connecting sleeves. This threading operation is particularly used on heating pipes.
- Threading is carried out using a die and a die head. The die head must be the same diameter as the pipe, otherwise the thread cannot be made.

